The amount of refrigerant an RV air conditioner needs depends heavily on the specific model and its cooling capacity, typically ranging from about 1 to 3 pounds of refrigerant for most common rooftop units. This exact quantity is critical for efficient operation and preventing damage to the system.
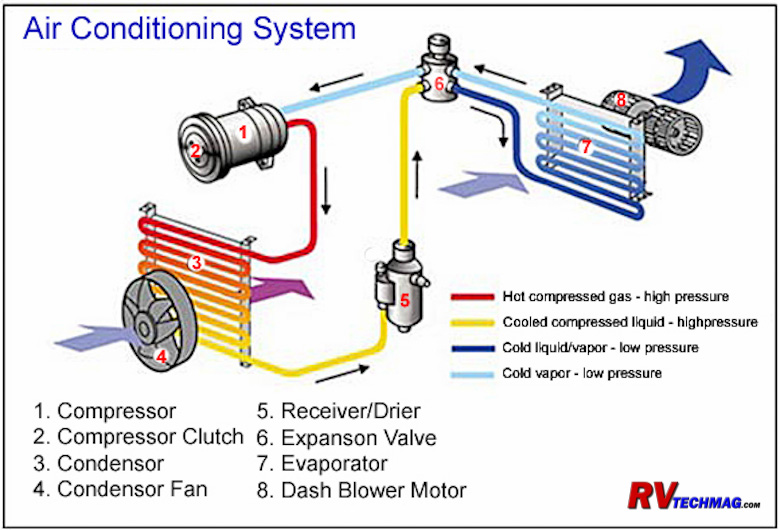
Image Source: www.rvtechmag.com
Deciphering RV AC Refrigerant Capacity
When you’re thinking about your RV air conditioner’s refrigerant needs, you’re really asking about its RV AC refrigerant capacity. This isn’t a one-size-fits-all answer. Each RV air conditioning unit is designed with a specific amount of refrigerant it needs to work correctly. This amount is crucial for the system to effectively transfer heat and cool your living space. Too much or too little refrigerant can cause significant problems, impacting both performance and lifespan.
Factors Influencing Refrigerant Charge
Several key factors determine the RV AC refrigerant capacity:
- Cooling Capacity (BTUs): Larger units designed to cool bigger spaces will generally require more refrigerant. This is directly linked to their RV AC cooling capacity refrigerant needs. A 15,000 BTU unit will need a different charge than an 8,000 BTU unit.
- System Design: The specific internal design of the air conditioner, including the size of the evaporator and condenser coils, plays a role. These components are engineered to work with a precise amount of refrigerant.
- Refrigerant Type: Different refrigerants have different densities and thermodynamic properties, influencing the required charge amount.
Where to Find Your RV AC’s Specific Charge Information
The most reliable place to find the exact RV AC refrigerant capacity for your unit is:
- Manufacturer’s Data Plate: Look for a sticker or plate on the air conditioner unit itself. This plate typically lists the model number, serial number, electrical specifications, and, importantly, the required refrigerant type and charge amount.
- Owner’s Manual: Your RV’s owner’s manual or the specific manual for your air conditioning unit will contain detailed specifications, including the RV AC refrigerant capacity.
- Manufacturer’s Website or Support: If you can’t find the information on the unit or in your manual, you can often find it on the manufacturer’s website by searching for your specific model number, or by contacting their customer support.
The RV Air Conditioner Charge Amount: Precision Matters
The RV air conditioner charge amount is not something to guess at. It’s a precise measurement. Think of it like filling a tire with air – too little and it’s flat and inefficient, too much and it can lead to damage. For RV air conditioners, the correct charge ensures optimal heat transfer, leading to efficient cooling and preventing unnecessary wear and tear on the compressor.
What Happens with an Incorrect Refrigerant Charge?
An incorrect charge can lead to a variety of issues:
- Low Refrigerant: This can happen due to a leak. If there’s not enough refrigerant, the system won’t be able to absorb enough heat from the inside air. This leads to poor cooling, frozen evaporator coils, and increased strain on the compressor, potentially causing premature failure.
- Overcharged Refrigerant: Too much refrigerant can also be detrimental. It can cause excessively high head pressures, leading to compressor overheating and damage. It can also reduce the system’s efficiency as the refrigerant may not be able to properly vaporize and condense.
RV AC Refrigerant Type: Knowing Your Options
The type of refrigerant used in your RV air conditioner is another critical piece of information. Historically, older RV AC units might have used R-22 (Freon), but due to environmental regulations, newer units primarily use R-410A. It’s crucial to know which RV AC refrigerant type your unit requires.
Understanding Different Refrigerant Types
- R-22 (Freon): This was a common refrigerant for many years. However, it is an ozone-depleting substance and is being phased out globally. If your RV AC unit uses R-22, you’ll likely find it noted on the data plate as RV AC Freon quantity. Service and recharge for R-22 are becoming increasingly difficult and expensive due to its scarcity.
- R-410A: This is the current industry standard for most new air conditioning systems, including RV ACs. It is more environmentally friendly than R-22, as it does not deplete the ozone layer. It also operates at higher pressures, requiring different tools and procedures for servicing.
Never mix refrigerants. Using the wrong type of refrigerant can severely damage your RV air conditioner. Always refer to the unit’s data plate or manual for the correct RV AC refrigerant type.
Troubleshooting Common Refrigerant Issues
A common problem with any sealed refrigeration system, including RV air conditioners, is the potential for a leak. Identifying and addressing an RV AC refrigerant leak is crucial for maintaining proper function.
Signs of a Refrigerant Leak
- Reduced Cooling: The most obvious sign is that your RV AC isn’t cooling as effectively as it used to.
- Icing on Coils: If you notice ice forming on the evaporator coils (inside the air handler), it can indicate low refrigerant.
- Hissing or Bubbling Sounds: In some cases, a leak might be audible as a hissing or bubbling sound, though this is not always the case.
- System Cycling On and Off Frequently: The system might try to run, but due to low refrigerant, it won’t reach the set temperature and will cycle off prematurely.
Addressing an RV AC Refrigerant Leak
If you suspect an RV AC refrigerant leak, it’s best to call a qualified RV technician. They have specialized tools to:
- Detect the Leak: Using electronic leak detectors, UV dye, or soap solutions, they can pinpoint the source of the leak.
- Repair the Leak: Depending on the location and severity, leaks can sometimes be repaired by brazing or replacing faulty components.
- Evacuate and Recharge: After the repair, the system needs to be evacuated of any remaining refrigerant and moisture, then recharged with the correct RV AC refrigerant capacity and RV AC refrigerant type.
RV AC Servicing Refrigerant: When and How
RV AC servicing refrigerant is a job that requires expertise and specialized equipment. It’s not a typical DIY task for most RV owners. Professional servicing ensures that the system is handled correctly, safely, and efficiently.
When to Consider RV AC Refrigerant Servicing
- Performance Degradation: If you notice a significant drop in cooling performance.
- Routine Maintenance: While not always necessary, periodic checks by a qualified technician can help identify potential issues before they become major problems.
- After Component Replacement: If a component like a compressor or expansion valve has been replaced, the system will need to be evacuated and recharged.
The Process of RV AC Refrigerant Servicing
- System Check: The technician will first perform a thorough inspection of the unit to identify any obvious issues.
- Leak Detection (if suspected): If low refrigerant is suspected, they will use leak detection methods.
- Evacuation (Vacuuming): If the system is being opened for repairs or recharged, it must be evacuated. This involves using a vacuum pump to remove all air and moisture from the system. Moisture can react with refrigerant and oil to form corrosive acids, damaging the system.
- Refrigerant Charge: The system is then recharged with the precise RV AC refrigerant capacity specified by the manufacturer, using the correct RV AC refrigerant type. This is often done by weight.
- Pressure and Performance Checks: After charging, the technician will monitor RV AC refrigerant pressure readings and check the system’s performance to ensure it’s operating within specifications.
RV AC Recharge: Restoring Cooling Power
An RV AC recharge is essentially the process of replenishing the refrigerant in the system. This is typically done after a leak has been repaired or if the system has been opened for servicing.
DIY vs. Professional RV AC Recharge
While you might see DIY recharge kits available for automotive air conditioning, it’s generally not recommended for RV air conditioners. Here’s why:
- Lack of Precision: DIY kits often involve adding refrigerant by pressure, which is not an accurate way to charge an RV AC system. The correct method is usually by weight.
- Wrong Refrigerant Type: Using the wrong type of refrigerant or overcharging can cause severe damage.
- No Leak Detection: DIY kits don’t typically include proper leak detection, so if there’s a leak, you’ll just be topping it off, and the problem will return.
- Safety Concerns: Refrigerants are under pressure and can cause frostbite if handled improperly.
- Warranty Issues: Tampering with the refrigerant system might void your RV AC unit’s warranty.
For these reasons, if your RV AC unit needs a refrigerant recharge, it’s best to rely on a qualified RV technician. They have the correct equipment and knowledge to perform an RV AC recharge safely and effectively.
How to Add Refrigerant to an RV AC (Professional Perspective)
For professionals, how to add refrigerant RV AC involves a precise procedure using specialized equipment. While you shouldn’t attempt this yourself, knowing the process can help you appreciate the expertise involved.
Essential Tools for Refrigerant Charging
- Refrigerant Scale: This is crucial for accurately weighing the correct amount of refrigerant into the system.
- Manifold Gauge Set: Used to measure system pressures (suction and discharge) and monitor the charging process.
- Vacuum Pump: To evacuate the system of air and moisture.
- Recovery Machine: To safely recover refrigerant from a system that needs repair or disposal.
- Leak Detector: To find any leaks.
- Appropriate Refrigerant: The exact type specified by the manufacturer.
The Professional Charging Procedure
- Leak Check and Repair: Before adding any refrigerant, any existing leaks must be identified and repaired.
- Evacuate the System: The system is pulled into a deep vacuum using a vacuum pump for a specified period (often 30 minutes or more) to remove all moisture.
- Connect Gauges and Scale: The manifold gauges are connected to the service ports, and the refrigerant cylinder is placed on the scale.
- Charge by Weight: The technician carefully opens the refrigerant valve, allowing the precise weight of refrigerant to flow into the system, as indicated by the scale.
- Monitor Pressures: While charging, the technician monitors RV AC refrigerant pressure and system temperatures to ensure everything is operating correctly and that the charge is being accepted.
- Final Checks: Once the correct charge is in, the gauges are removed, and the system is run to confirm proper operation and cooling.
RV AC Cooling Capacity and Refrigerant
The RV AC cooling capacity refrigerant relationship is direct. The amount and type of refrigerant are calibrated to the size and design of the cooling system.
- Capacity Measurement: Cooling capacity is typically measured in British Thermal Units (BTUs). An RV AC unit’s BTU rating indicates how much heat it can remove from the air per hour.
- Refrigerant’s Role: Refrigerant is the medium that absorbs heat from inside the RV and releases it outside. The amount of refrigerant directly impacts how much heat the system can absorb and reject.
- Efficiency: The correct refrigerant charge ensures the system operates at its designed efficiency, maximizing its RV AC cooling capacity refrigerant output.
RV AC Refrigerant Pressure: Key Indicators
RV AC refrigerant pressure is a vital diagnostic tool for technicians. By measuring the pressures within the high-side and low-side of the refrigeration cycle, a trained professional can determine if the system is operating correctly or if there are issues with the refrigerant charge or other components.
Interpreting Refrigerant Pressures
- Normal Operation: In a properly charged system operating under normal conditions, refrigerant pressures will fall within a specific range, varying with ambient temperature and indoor conditions.
- Low Pressure: Consistently low suction pressure (on the low side of the gauges) often indicates a low refrigerant charge.
- High Pressure: Consistently high discharge pressure (on the high side) can indicate an overcharged system or a restriction in the refrigerant flow.
- Other Issues: Abnormal pressures can also point to problems like a dirty condenser coil, a failing fan motor, or a faulty compressor.
Because interpreting RV AC refrigerant pressure requires specialized knowledge and tools, it’s another reason why professional servicing is recommended.
Frequently Asked Questions (FAQ)
Can I just “top off” my RV AC refrigerant if it seems low?
No, it’s strongly advised against topping off refrigerant without first finding and repairing the leak. If your RV AC is low on refrigerant, it means there’s a leak. Simply adding more refrigerant without fixing the leak is like putting a band-aid on a serious wound – it’s a temporary fix that will ultimately lead to further problems and potential damage to the system. You also risk overcharging the system, which can be just as damaging as undercharging.
How often should my RV AC refrigerant be checked?
Refrigerant levels don’t typically need to be checked on a fixed schedule unless you’re experiencing a noticeable drop in cooling performance. RV air conditioners are sealed systems. If they are performing well, the refrigerant charge is likely correct. If you suspect a problem, have it inspected by a qualified technician.
What does “Freon” mean in the context of RV AC?
“Freon” is a brand name for a type of refrigerant, most commonly associated with R-22. If your RV AC unit uses R-22, you might see it referred to as Freon. However, R-410A is the modern, environmentally friendlier refrigerant used in most new RV AC units. Always confirm the specific refrigerant type your unit requires.
Is it expensive to recharge an RV AC?
The cost of an RV AC recharge can vary. It depends on the amount of refrigerant needed, the type of refrigerant (R-22 is more expensive than R-410A due to its phase-out), and the labor costs. It’s important to factor in the cost of leak repair as well, as this is a necessary step before recharging. Getting an estimate from a qualified technician is the best way to know the potential cost.
Can I add refrigerant myself if I buy a can from the auto parts store?
While some DIY cans are available for automotive AC systems, they are generally not recommended for RV air conditioners for several critical reasons. RV AC units are more complex, and improper charging by weight is essential for optimal performance and longevity. Using the wrong type or amount of refrigerant, or failing to properly evacuate the system, can cause significant damage and costly repairs. It’s always best to leave refrigerant handling to trained professionals.
By understanding these aspects of RV air conditioner refrigerant, you can better appreciate the importance of proper maintenance and when to call in the experts.
My name is Carlos Gadd, and I am the creator of AirPurityGuide.com.. With a passion for footwear, I share my experiences, insights, and expertise about shoes. Through my blog, I aim to guide readers in making informed decisions, finding the perfect pair, and enhancing their footwear knowledge. Join me on this journey to explore everything about shoes!