Can you clean a motocross air filter? Yes, you absolutely can and should clean your motocross air filter regularly! A clean air filter is crucial for your dirt bike’s performance and longevity. This guide will walk you through the motocross air filter cleaning process, ensuring you know the proper way to clean dirt bike air filter for optimal results. We’ll cover everything from selecting the right tools to the final step of cleaning and oiling motocross air filter. Mastering motocross air filter maintenance will save you money and keep your bike running smoothly.
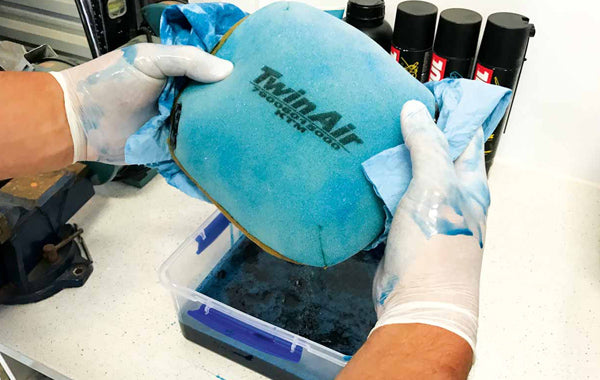
Image Source: riskracing.com
Why A Clean Air Filter Matters
Your dirt bike’s engine needs clean air to breathe. The air filter is the first line of defense against dirt, dust, mud, and debris that can enter your engine. If your air filter is clogged, it restricts airflow, forcing your engine to work harder and potentially causing damage.
- Performance: A dirty filter restricts airflow, leading to a richer fuel-air mixture. This can cause your bike to bog down, lose power, and run inefficiently.
- Engine Longevity: Tiny particles of dirt can act like sandpaper, wearing down internal engine components like pistons, cylinders, and valves. This can drastically shorten the life of your engine.
- Fuel Economy: When the engine struggles to get enough air, it can consume more fuel to compensate.
- Starting Issues: A severely clogged filter can even make your bike difficult to start.
How Often Should You Clean Your Motocross Air Filter?
The frequency of how often to clean motocross air filter depends heavily on the riding conditions.
- Dry and Dusty Conditions: If you ride in a lot of dust, you might need to clean your filter after every few rides, or even after a single long, dusty day.
- Muddy or Wet Conditions: While mud can coat a filter, it doesn’t always clog it as severely as fine dust. However, it’s still important to clean it promptly to prevent moisture and debris buildup.
- Clean Trails: On cleaner, less dusty trails, you can probably go longer between cleanings, perhaps every 5-10 rides.
The best practice is to inspect your filter regularly. A quick visual check will tell you if it’s getting dirty. If you can’t see through it, it’s time for a clean.
Essential Tools and Supplies for Motocross Air Filter Cleaning
Having the right motocross air filter cleaner kit or individual supplies makes the job much easier and more effective.
The Air Filter Itself
- Foam Filters: Most modern motocross bikes use foam air filters. These are durable and washable.
- Paper Filters: Some older bikes or specific applications might use paper filters, which are disposable and cannot be cleaned. This guide focuses on foam filters.
Cleaning Supplies
- Air Filter Cleaner: You need a specialized cleaner designed for foam filters. These cleaners break down the oil and dirt without damaging the foam. Do NOT use gasoline or harsh solvents, as they will degrade the foam.
- Air Filter Oil: After cleaning, you must re-oil your filter with a sticky, specialized foam air filter oil. This oil traps dirt and dust.
- Bucket or Basin: You’ll need a container large enough to submerge the filter in cleaner. Two buckets are ideal – one for the initial wash and one for rinsing.
- Gloves: Protect your hands from the cleaner and oil.
- Water Source: For rinsing the filter.
Drying Supplies
- Clean Rags or Paper Towels: For squeezing out excess water.
- Optional: Air Compressor: Can speed up the drying process, but use low pressure to avoid damaging the foam.
Re-oiling Supplies
- Air Filter Oil: As mentioned above.
- Plastic Bag or Container: To hold the oiled filter.
- Optional: Air Filter Pouch/Bag: Some riders use dedicated bags for re-oiling.
Step-by-Step: How To Clean Your Motocross Air Filter
Now, let’s get down to the nitty-gritty of motocross air filter cleaning. Follow these steps carefully for the best way to clean motocross air filter.
Step 1: Remove the Air Filter
- Locate the Airbox: The air filter is usually housed in a plastic enclosure, typically accessible from the side or under the seat. Consult your bike’s manual if you’re unsure.
- Open the Airbox: This usually involves releasing clips or removing a few screws.
- Carefully Remove the Filter: Gently pull the filter out. Be mindful not to let any dirt fall into the intake tract. Some riders place a clean rag in the intake opening once the filter is removed.
Step 2: Initial Cleaning
- Brush Off Loose Dirt: If the filter is heavily caked with mud or large debris, gently brush off as much as you can with a soft brush before applying cleaner.
- Submerge in Cleaner: Fill a bucket with the recommended amount of foam air filter cleaner and water. Submerge the filter completely.
- Work the Cleaner In: Gently squeeze and knead the filter in the solution. Work the cleaner through the foam to break down the oil and dirt. Do this repeatedly. You’ll see the dirty water turn brown.
- Empty and Refill: You may need to drain the dirty cleaner and refill the bucket with fresh solution to complete the cleaning process, especially if the filter was very dirty.
Step 3: Rinse Thoroughly
- Rinse with Water: Once the cleaner has done its job, rinse the filter thoroughly under cool, running water.
- Squeeze, Don’t Wring: Gently squeeze the water and residual cleaner out of the foam. Crucially, do not wring or twist the filter, as this can tear the foam. Continue squeezing until the water runs clear.
Step 4: Drying the Filter
This is a critical step. A damp filter will not accept oil properly and can lead to engine issues.
- Squeeze Out Excess Water: Gently squeeze out as much water as possible using clean rags or paper towels.
- Air Dry: The best method is to let the filter air dry completely. Place it in a clean, well-ventilated area away from direct sunlight.
- Optional: Air Compressor: You can use an air compressor on a low-pressure setting to help blow out remaining water. Hold the compressor nozzle a good distance away from the foam and blow from the inside out. Be very careful not to over-pressurize or blow holes in the filter.
Drying Time: Depending on humidity and temperature, this can take several hours. Patience is key here. Never try to install a damp filter.
Step 5: Re-oiling the Filter
This is where cleaning motocross air filter oil comes into play. Properly oiling a motocross air filter is as important as cleaning it.
- Choose the Right Oil: Use only oil specifically designed for foam motocross air filters. Do not use motor oil or any other lubricant.
- Apply the Oil: Pour a generous amount of filter oil onto the filter.
- Work the Oil In: Gently squeeze and knead the filter, working the oil evenly throughout the foam. The goal is to saturate every pore of the foam without leaving any dry spots or excessive clumps of oil. You want a consistent, tacky feel.
- Remove Excess Oil: Squeeze out any excess oil. You want the filter to be tacky, not dripping. Too much oil can get sucked into the engine, causing fouling of spark plugs and other issues.
- Bag It: Place the oiled filter in a clean plastic bag or container. This keeps it clean and moist until you’re ready to install it.
Step 6: Reinstall the Air Filter
- Ensure the Airbox is Clean: Before installing the clean, oiled filter, double-check that the airbox is completely free of any dirt or debris.
- Install the Filter: Carefully place the filter back into the airbox, ensuring it seals properly around the edges. A good seal is vital.
- Secure the Airbox: Close and secure the airbox cover, making sure all clips or screws are properly fastened.
Specialized Cleaning Kits and Their Benefits
For those who want a streamlined approach, a motocross air filter cleaner kit can be a great investment. These kits typically include:
- Foam air filter cleaner
- Foam air filter oil
- A re-oiling bag or container
- Sometimes, gloves or a cleaning brush
Benefits of using a kit:
- Convenience: All the necessary supplies are in one package.
- Compatibility: The cleaner and oil are formulated to work together and are safe for foam filters.
- Cost-Effective: Often, buying a kit is cheaper than purchasing individual items.
Maintaining Your Motocross Air Filter: Tips for Success
Consistent maintaining motocross air filter practices will ensure your bike performs at its best.
- Carry a Spare Filter: For longer rides or races, carry a spare, pre-oiled filter. This allows you to swap out a dirty filter quickly and clean the dirty one later.
- Clean Airbox Thoroughly: Always wipe down the inside of your airbox before reinstalling the filter.
- Check Filter Seal: Ensure the filter is seated correctly and seals all around. A loose filter is as bad as a dirty one.
- Inspect Foam Condition: Over time, foam filters can degrade. Look for tears, dry spots, or excessive hardening of the foam. If the foam is damaged, it’s time for a new filter.
- Proper Storage: Store clean, oiled filters in sealed plastic bags to prevent them from drying out or picking up dust.
Common Mistakes to Avoid During Motocross Air Filter Cleaning
Even with the best intentions, some common errors can occur. Knowing these can help you avoid them:
- Using the Wrong Cleaner: Gasoline, kerosene, or harsh degreasers will damage the foam, making it brittle or causing it to break down. Always use a cleaner specifically made for foam air filters.
- Wringing or Twisting the Filter: This is a cardinal sin of foam filter maintenance. It tears the delicate foam structure, compromising its ability to filter.
- Not Drying Completely: Installing a damp filter leads to oil being pulled into the engine, causing fouling and poor running.
- Over-Oiling: Too much oil can be pulled into the engine, leading to a rich fuel mixture, fouled spark plugs, and reduced performance.
- Under-Oiling: Not enough oil leaves the foam unprotected, allowing dirt to pass through to the engine.
- Forgetting the Airbox: Installing a clean filter into a dirty airbox defeats the purpose.
- Forgetting the Seal: A poorly seated filter allows unfiltered air and dirt into the engine.
Conclusion: The Importance of a Clean Air Filter
Motocross air filter cleaning is not just another chore; it’s a vital part of keeping your dirt bike running optimally and protecting your investment. By following these detailed steps on how to clean dirt bike air filter and cleaning motocross air filter foam, you’ll ensure your engine receives the clean air it needs for peak performance and a long life. Remember to use the correct cleaning motocross air filter oil and supplies, be patient with the drying process, and always inspect your filter regularly. Proper maintaining motocross air filter habits will pay dividends in the long run.
Frequently Asked Questions (FAQ)
Q1: Can I use dish soap to clean my motocross air filter?
A1: While dish soap can remove some oil, it’s generally not strong enough to break down the specialized filter oil and ingrained dirt effectively. It also might not rinse out as cleanly, potentially leaving residue. It’s best to use a cleaner specifically designed for foam air filters.
Q2: How long does it take for a motocross air filter to dry?
A2: Drying time varies greatly depending on humidity, temperature, and how much water was squeezed out. It can range from a few hours to overnight. Always ensure it’s completely dry before re-oiling and installing.
Q3: What happens if I over-oil my motocross air filter?
A3: Over-oiling can cause the oil to be pulled into the engine’s intake tract. This can lead to a rich fuel mixture, fouling the spark plug, and reducing engine performance. It can also potentially damage engine components over time.
Q4: Can I reuse a disposable paper air filter?
A4: No, paper air filters are designed for single use and cannot be cleaned. Attempting to clean them will likely damage the paper media, rendering it ineffective.
Q5: Is there a difference between air filter oil for foam filters and oiled gauze filters (like K&N)?
A5: Yes, there is a significant difference. Foam filter oil is sticky and designed to saturate the foam pores. Oiled gauze filter oil is thinner and designed to coat the cotton gauze. Using the wrong type of oil can damage the filter media and lead to poor filtration. Always use the oil specified for your particular type of air filter.
Q6: Should I clean my air filter after every ride?
A6: It depends on the riding conditions. In very dusty or muddy conditions, cleaning after every ride is a good idea. In cleaner conditions, you might be able to get away with cleaning it every few rides, but always inspect it visually.
Q7: How do I know if my foam air filter needs to be replaced?
A7: Replace your foam air filter if you notice tears, holes, or excessive hardening of the foam. If the foam starts to crumble or disintegrate, it’s definitely time for a new one. A damaged filter will not protect your engine.
My name is Carlos Gadd, and I am the creator of AirPurityGuide.com.. With a passion for footwear, I share my experiences, insights, and expertise about shoes. Through my blog, I aim to guide readers in making informed decisions, finding the perfect pair, and enhancing their footwear knowledge. Join me on this journey to explore everything about shoes!