Image Source: blogs.cdc.gov
Save Big: Your Complete Do It Yourself Air Purifier Guide
Poor air quality at home can make you sick. Things like dust, pollen, pet dander, and even tiny germs float in the air. These things can make it hard to breathe. They can cause allergies or make asthma worse. Many people wonder, “Can I build my own air purifier?” Yes, you absolutely can! It is a simple and effective way to get cleaner air at home. This guide will show you how to build your own air purifier, saving you money and helping you breathe easier.
Why Make Your Own Air Purifier?
Making your own air purifier offers many good reasons. First, it saves you a lot of money. Store-bought air purifiers can cost hundreds of dollars. A homemade air cleaner can cost much less, often under $100. This makes a cheap DIY air filter a great choice for many homes.
Second, you get to pick what goes into it. You can choose the best filters for your needs. This lets you make a system that works just right for your home. You can make a DIY air filtration system that targets specific problems, like pet hair or smoke.
Third, it helps your health. Good air in your home is vital. It can cut down on dust and allergens. This means fewer sneezes and sniffles. It helps improve DIY indoor air quality greatly. People with allergies or breathing problems often feel much better. Cleaner air can also help you sleep better at night.
Many things pollute our indoor air. Cooking fumes, cleaning products, candles, and even our pets release small bits into the air. A good air purifier grabs these bits. It pulls them out of the air you breathe. This makes your living space much safer and more pleasant.
Core Elements of a DIY Air Purifier
Every air purifier, whether bought or built, needs two main parts: a fan and a filter. These two parts work together to clean the air.
The Fan
The fan is the engine of your air purifier. It pulls air into the unit. It then pushes the air through the filter. For a DIY unit, a simple box fan works very well.
Box fans are flat, square fans. They are easy to find and not expensive. They move a lot of air. They are also stable, which is good for holding filters.
When you pick a fan, think about its size. A 20-inch box fan is common. It fits well with standard filter sizes. Make sure the fan is in good shape. Check the power cord for any damage. Always keep safety in mind. Do not block the fan’s motor vents. This helps prevent it from getting too hot.
The Filter
The filter is the cleaning part. It catches dust, pollen, and other tiny things. Filters have a MERV rating. MERV stands for Minimum Efficiency Reporting Value. It tells you how well a filter cleans the air.
- MERV Rating Explained:
- Lower MERV numbers (1-4) catch big things like dust mites and carpet fibers.
- Mid-range MERV numbers (5-8) catch mold spores and pet dander.
- Higher MERV numbers (9-12) catch smaller things like car fumes and fine dust.
- Very high MERV numbers (13-16) catch tiny bits like bacteria and smoke.
For a DIY air purifier, a MERV 13 filter is a great choice. Why MERV 13? It catches very small particles, including many allergens and some viruses. It also lets air pass through without putting too much stress on your fan. This makes it a great MERV 13 fan filter choice for your project. You can also look for filters with a HEPA filter rating. While a true HEPA filter is very dense and might need a stronger fan, a DIY HEPA filter fan setup often uses MERV 13 or higher filters to get close to HEPA-level cleaning.
Assembling It All Together
The basic idea for a homemade air cleaner is simple. You put a filter (or many filters) around a fan. The fan pulls air through the filters. The filters catch the bad stuff. Clean air then blows out. This simple idea forms the base of many DIY air purifier designs.
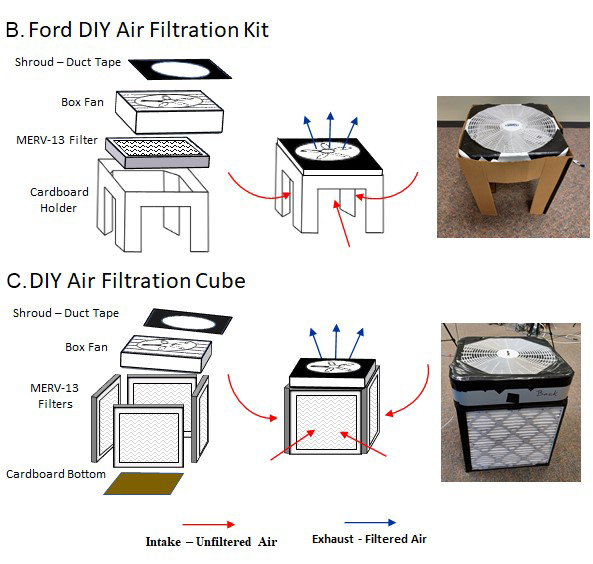
The Corsi-Rosenthal Box: A Proven Design
One of the best DIY air purifier designs is the Corsi-Rosenthal Box. It became very popular during the recent pandemic. It is a powerful and low-cost way to clean indoor air.
What It Is
The Corsi-Rosenthal Box is a simple design. It uses a box fan and four or five air filters. These filters are taped together around the fan. This creates a large filter area. This large area helps clean a lot of air very quickly. It is a great example of a portable DIY air purifier.
It works because air has to pass through the filters before it gets to the fan. The fan pulls air from all sides of the box. This makes it very effective at catching small particles. Dr. Richard Corsi and Jim Rosenthal helped share this design. It is now used in homes, schools, and offices worldwide to boost DIY indoor air quality.
Materials Needed
Building a Corsi-Rosenthal Box is quite simple. You can find all the parts at most hardware stores.
- One 20-inch box fan.
- Four or five 20x20x2-inch MERV 13 air filters. (You can use 4 filters if you tape them to the fan, or 5 if you build a bottom and top filter square.)
- Duct tape or strong packing tape.
- A marker or pen.
- A measuring tape or ruler.
- Scissors or a utility knife.
The cost for these parts is usually less than $100. This makes it a very cheap DIY air filter solution compared to buying a store-made unit.
Step-by-Step Building Guide
Here is how to build your own Corsi-Rosenthal Box:
- Get Your Filters Ready: Lay out your four MERV 13 filters on a clean flat surface. Make sure the arrows on the filter (which show airflow direction) all point towards the center of where the fan will go.
- Tape the Filters Together: Stand two filters up so they make a corner. Tape them together along the seam. Repeat with the other two filters. Now you have two “L” shapes.
- Make a Square: Bring the two “L” shapes together to form a square. Tape the last two seams. You now have a filter cube with an open top and bottom.
- Place the Fan: Put your box fan on top of the filter cube. Make sure the fan is blowing air out of the box. This means the fan’s motor side should be facing into the filter cube. Line up the fan’s edges with the filter edges.
- Seal the Fan to the Filters: Use duct tape to seal the fan’s edges to the top edges of the filter cube. Make sure there are no gaps. Air should only be able to enter through the filter sides.
- Add a Top Filter (Optional but Recommended): If you are using five filters, place the fifth filter on top of the fan. Tape it securely to the fan’s sides. This adds another layer of filtration and helps keep the fan clean. This is an advanced step for a more complete DIY air filtration system.
- Check for Gaps: Look around all the taped seams. Make sure there are no open spaces where air can sneak in without going through a filter. Seal any gaps with more tape.
- Test It Out: Plug in your new Corsi-Rosenthal Box. Turn it on a low setting first. You should feel air blowing out of the top (or through the top filter if you used one). It should be a steady flow. You have just built a powerful homemade air scrubber!
Variations and Other DIY Air Filter Ideas
The Corsi-Rosenthal Box is great, but there are other ways to build your own air purifier.
Simple Filter-Fan Combo
This is the easiest DIY air purifier to make. You only need a box fan and one filter.
- How to Make It: Simply tape a MERV 13 filter to the back of your box fan. Make sure the filter’s arrow points into the fan. The fan will pull air through the filter.
- Benefits: It is very cheap and quick to build. It’s also a very portable DIY air purifier. You can move it from room to room easily.
- Limits: It doesn’t clean as much air as a Corsi-Rosenthal Box. It only has one filter, so the filter gets dirty faster. But it is still much better than no filter at all for improving DIY indoor air quality.
Homemade Air Scrubber for Specific Needs
Sometimes you need to clean very dirty air. Think about a workshop with sawdust. Or a garage where you do messy projects. For these spots, you can make a homemade air scrubber. This is a robust DIY air filtration system.
- How to Make It: These often use multiple filters in a more closed box design. You might use a stronger inline fan instead of a box fan. You can also add a pre-filter (like furnace filter material) to catch big dust first. This makes the main filters last longer.
- Special Filters: For smoke or fumes, you might add activated carbon filters. These absorb smells and gases.
- Uses: Great for areas with high dust, strong smells, or chemicals. It helps keep the air safe to breathe during projects.
Materials List & Tools
Here is a simple list of what you need to build your air purifier.
| Item | Description | Estimated Cost Range | Notes |
|---|---|---|---|
| Box Fan | 20-inch fan, preferably 3-speed | $20 – $35 | Check for good condition; new is best for long life. |
| MERV 13 Air Filters | 20x20x2-inch (4 or 5 needed) | $8 – $15 each | Look for good brands. The higher the MERV, the better, but MERV 13 is a good balance for a DIY HEPA filter fan without stressing the fan. |
| Duct Tape | Strong, wide roll | $5 – $10 | Crucial for sealing filters and fan. Choose a good quality tape for best results. |
Tools You Will Need:
- Scissors or a utility knife (for cutting tape)
- Measuring tape or ruler (for lining up filters)
- Marker or pen (optional, for marking)
Assembly Instructions
Building your DIY air filter is straightforward. Follow these general steps for most designs. We will focus on the Corsi-Rosenthal Box as the main example.
- Gather Your Supplies: Lay out all your materials in a clean, open area. This makes the build easy.
- Safety First: Before you begin, always make sure the fan is unplugged. Keep all tools safely put away when not in use.
- Prepare Filters: Look for the arrow on the side of each MERV 13 filter. This arrow shows the direction of airflow. For the Corsi-Rosenthal Box, all arrows should point inward, towards the fan.
- Tape Filters Together (Corsi-Rosenthal Box):
- Stand two filters up. Make sure the arrows point the same way.
- Join them at a 90-degree angle. Tape the seam where they meet. Use long strips of tape from top to bottom. Press firmly to seal well.
- Do this for all four filters, creating a square or cube shape. You should have a box with an open top and an open bottom.
- Position the Fan: Place the fan on top of the filter cube. Make sure the fan’s “front” (where air normally blows out) faces up. The fan will pull air through the filters and then push it out the top.
- Seal Fan to Filters: Use plenty of duct tape to seal the fan’s edges to the top edges of the filter cube. Take your time. Ensure there are no gaps. No air should escape without passing through a filter. This is key for your DIY air filtration system to work well.
- Add a Top Filter (Optional): If using five filters, place the fifth filter on top of the fan. Tape it down just like you taped the fan to the other filters. This adds more filtering power. It also protects the fan from dust.
- Final Check: Look over your whole homemade air cleaner. Are all seams taped? Are there any small gaps? If so, add more tape. Even small gaps can let unfiltered air sneak through.
- Power It Up: Plug in your finished air purifier. Turn it on a low setting. You should feel air coming out the top. It might make some noise, but it should not sound strained.
Placement and Use
Where you put your DIY air purifier matters. Place it in the room you use most often. Living rooms and bedrooms are good choices. For best results, put it in the center of the room. This lets it pull air from all sides. Avoid putting it right against a wall. This can block airflow.
You can run your air purifier most of the time. Many people run theirs 24/7. This keeps the air clean all the time. On a low setting, it will use little power. It also makes less noise. If the air is very bad (like during allergy season or after cooking), run it on a higher setting for a few hours. This helps clear the air faster.
Noise is a factor. Box fans can be noisy on high settings. On low, they are often quiet enough for daily use. If noise is a problem, run it on high when you are not in the room. Then switch to low when you are there.
Maintenance and Care
A DIY air filter needs simple care to keep working well.
Filter Changes
The filters are the most important part to maintain. How often you change them depends on how dirty your air is.
* General Rule: Change filters every 1 to 3 months.
* Signs of a Dirty Filter:
* The filter looks gray or black.
* Airflow from the fan feels weaker.
* The fan sounds louder or strained.
* You notice dust building up around the fan.
* Changing Filters: Unplug the fan. Carefully remove the old filters. They will be dirty. Put them in a trash bag right away to keep dust from spreading. Then, put in new MERV 13 filters, making sure the arrows face the right way. Re-tape everything securely.
Cleaning the Fan
Over time, dust can build up on the fan blades.
* How to Clean: Unplug the fan. Gently wipe the fan blades and grille with a damp cloth. You can also use a vacuum with a brush tool to get dust off. Do not use water near the motor.
* Frequency: Clean the fan every few months, or when you change filters.
Safety Checks
- Power Cord: Check the fan’s power cord often. Make sure there are no cuts or frays. If the cord is damaged, stop using the fan.
- Overheating: Feel the fan motor area after it runs for a while. It should be warm, but not very hot. If it feels too hot, turn it off. Make sure no vents are blocked.
Assessing Air Quality
Once you build your homemade air cleaner, how do you know it is working?
- Look for Less Dust: You should see less dust settling on surfaces.
- Smell Cleaner Air: The air in your home should smell fresher. Odors from cooking or pets should lessen.
- Feel Better: If you have allergies or asthma, you might notice fewer symptoms. Less sneezing, less coughing. This is a direct benefit of better DIY indoor air quality.
For a more exact check, you can buy a simple air quality monitor. These devices show you numbers for particles in the air. You can run your DIY air purifier and watch the numbers drop. This can be a fun way to see how well your DIY HEPA filter fan is working.
Benefits Beyond Cost
The savings are a big reason to build your own air purifier. But there are other great benefits too.
- Health Benefits: As mentioned, cleaner air means less pollen, dust, and pet dander. This can greatly reduce allergy symptoms. It can also help people with asthma breathe easier. Breathing cleaner air can also lead to better sleep. It can even help your body stay healthier in general by reducing the load on your lungs.
- Peace of Mind: Knowing you have taken steps to make your home healthier is a good feeling. You can relax, knowing the air your family breathes is cleaner. This adds to your overall well-being.
- Environmental Impact: Making your own air filter often uses less packaging than buying a new one. It also encourages reusing a box fan, which is good for the environment. You are creating a useful item from simple parts.
- Empowerment: Building something yourself is a skill. It shows you can solve problems. It makes you feel good to create something useful that helps your home. This type of DIY project gives you control over your living space.
Safety First: Key Precautions
Safety is very important when using any electrical device, especially a homemade one.
- Fan Safety:
- Keep the fan’s motor clear. Do not cover the vents.
- Do not put the fan in a place where it can fall over.
- Keep children and pets away from the moving fan blades. Even with guards, fingers can get caught.
- Electrical Safety:
- Always plug the fan directly into a wall outlet. Avoid using extension cords unless absolutely necessary. If you must use an extension cord, make sure it is rated for the fan’s power.
- Never use a fan with a damaged cord or plug.
- Do not run the fan if it makes strange noises or smells like burning. Unplug it right away.
- Keep the fan away from water. Never use it in a bathroom or very damp area.
- Filter Handling:
- When changing filters, wear a mask. This stops you from breathing in the dust and particles trapped in the old filter.
- Wash your hands after handling old filters.
- Dispose of old filters properly, often in a sealed trash bag.
These simple steps ensure your cheap DIY air filter works safely and lasts a long time.
Frequently Asked Questions (FAQ)
How often should I change the filters in my DIY air purifier?
It depends on how dirty your air is and how much you run it. A good rule is every 1 to 3 months. If you have pets, allergies, or dusty air, you might change them more often. Watch for the filters getting dark or reduced airflow.
Can a Corsi-Rosenthal Box filter viruses?
Yes, MERV 13 filters can catch many small particles, including those that carry viruses. While not a complete safeguard, a Corsi-Rosenthal Box can greatly reduce airborne virus particles in a room. This is a key part of improving DIY indoor air quality.
Is a homemade air cleaner noisy?
It depends on the fan speed. On a low setting, most box fans are fairly quiet. On high, they can be louder. Many people find the noise like white noise, which can help with sleep. You can always run it on a higher setting when you’re not in the room.
How many DIY air purifiers do I need for my home?
One Corsi-Rosenthal Box can clean the air in a large room (around 200-400 square feet). For a whole house, you might need one for each main living area or bedroom. A portable DIY air purifier makes it easy to move it where you need it most.
Is it safe to leave my DIY air purifier on all the time?
Yes, if built correctly and safely, it’s generally safe to leave it on 24/7. Make sure the fan’s motor vents are not blocked. Check the cord often. Running it all the time keeps your air clean and fresh.
Will a cheap DIY air filter help with pet dander and odors?
Yes! MERV 13 filters are very good at catching pet dander. For pet odors, a filter-fan combo will help by removing the airborne particles. For very strong odors, you might add an activated carbon filter to your DIY air filtration system.
Conclusion
Building your own air purifier is a smart move. It saves money. It gives you cleaner air. It helps your health. Whether you choose the simple filter-fan combo or the powerful Corsi-Rosenthal Box, you are taking control of your indoor air quality. You now have the full guide to build your own air purifier. So, get your supplies and start breathing easier today! Your lungs will thank you.
My name is Carlos Gadd, and I am the creator of AirPurityGuide.com.. With a passion for footwear, I share my experiences, insights, and expertise about shoes. Through my blog, I aim to guide readers in making informed decisions, finding the perfect pair, and enhancing their footwear knowledge. Join me on this journey to explore everything about shoes!